Crafting for a Greener World:
Découpage Wall Art With Overpainting
by Robyn Coburn
Here’s a project that will provide you with the skills to rejuvenate and repurpose a variety of old, and often discarded, household items and architectural pieces – from old trays and the fronts of old cupboards with the handles removed, to shelves, old cutting boards that are too scored to be useful, larger doors such as armoire fronts, or the inside of old frying pans. By the way, if you have some light weight doors, use hinges to join them in a concertina and, presto, a folding floor screen.
I’ll show you how to create gorgeous hand painted figurative art with a technique called “overpainting,” which allows you to use the basic shape of a photographed figure instead of drawing from scratch. In this project, we combine overpainting with découpaged collage.
Tools & Materials
Repurposed base item
Cleaning cloths
Sandpaper
Dust mask
Protective gloves (if needed)
Scissors – small with a point
White glue and/or decoupage medium
Acrylic paints – non toxic
Black waterproof or permanent marker
Inks (on stamp pads) if desired |
Brushes
Brayer or roller (rolling pin)
Old pictorial magazines
Optional: fabric remnants, lace, ribbon
paper ephemera
craft wire
needle and thread
rotary tool or awl
Hanging hardware & tools |
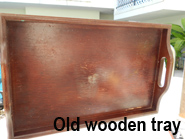 Step1: Prep your chosen surface to accept glues and paint. Step1: Prep your chosen surface to accept glues and paint.
I can't stress enough how important it is to have a clean but roughened surface on which to work. Remove any dirt or oils. Sand the surface if needed and clean off dust with a slightly soapy damp cloth. Please use dust masks if you are unsure about the prior paint finish on older wood pieces.
Step 2 Create your abstract background.
You can choose to paint, perhaps scumbling (blending the edges while still wet) different colors together. You can paint an even coat of a single color, or you can stain your surface allowing the wood or prior finish to show through. You can sponge your paint on, and rag or scrape some away to create texture. Don't let it get too bumpy because you will still need to adhere paper over it.
Or, you can create a decoupaged background with strips or pieces from your magazines. Try to have the white from the torn edges showing. Adhere with decoupage medium or white glue. When it is dry wash over it with translucent paint if you like.
Step 3: Choose a face at a nice angle.
Your character will not be recognizable after overpainting. Tear the page from your magazine.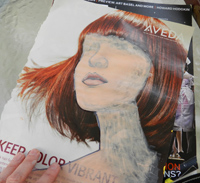
Draw an outline around the face or figure with your permanent marker, extending down the the decolletage – so that basically you have a bust. On the face sketch in the details you want to keep with your marker. You will be painting over these lines.
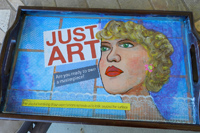
Step 4: Overpaint.
Paint over the eyes with white or pale gray. Paint over the face with whatever skin color appeals to you. You will probably need more than one coat. Reshape the lips. Add details – the iris, makeup, eyebrows and eyelashes. Add shadows with a light touch of slightly darker paint, or follow the lead of the Expressionists and paint your shadows in purple or green. Remember the hair.
Once the face is dry, cut it out with small scissors.
Step 5: Compose the image.
People tend to follow the gaze of other faces. Usually the eyes in a portrait should be facing the middle of the page, rather than off the edge. (Unless you are employing this as a device to draw your viewer's attention somewhere else). Usually the main image is more attractive slightly off center (see Sidebar).
Small ephemera like tickets or fortune cookie sayings can peek out from behind the head. Position these first.
When you are happy with the composition, apply white glue or decoupage medium to the back of the face with a brush and adhere to your background. Roll to smooth.
Step 6: Embellish.
Layer on paper or fabric embellishments and borders. Is your character a circus clown, a fashion model, a witch, a fairy? She might need a cut out hat, a fancy headband or a collar, some hardware earrings, or perhaps a necklace. If your bits and bobs are heavy, drill small holes in the backing and secure them with craft wire.
 Run a horizontal border piece across the decolletage. Crumple then unfold strip of coordinating paper (magazine pages again!) then distress with ink or paint along the “peaks” of the wrinkles. Layer on some ribbon or lace, even stitching it to the paper. Run a horizontal border piece across the decolletage. Crumple then unfold strip of coordinating paper (magazine pages again!) then distress with ink or paint along the “peaks” of the wrinkles. Layer on some ribbon or lace, even stitching it to the paper.
I love lettering and words in my artwork. You can name your character, and use cut out, stamped or stenciled letters in the space beside the face. Or add a quotation, printed or written. For depth, cut letters from corrugated cardboard, and cover them with pages of text.
Step 7: Hang and Enjoy!
A word about glues:
I recommend checking your glue to ensure that it is labeled non-toxic. Fabric glues, decoupage medium and tacky glues stay flexible when dry while regular white glue dries rigid, and may wrinkle paper, which is why I prefer decoupage medium for this type of project.
However if you wish to make your own paper glue, there is always the old standby of cornflour and water. Recipes have varying proportions, but I put about half a cup of cornflour in 4 cups of water. Bring to a boil and stir until reduced to a soft gel consistency. The gel will continue to thicken on cooling. Only cook as much as you will use within a couple of days, and keep refrigerated.
When using this glue please be aware that if it takes too long to dry, your project could develop mildew, so work in layers allowing each to dry thoroughly. Some recipes call for adding borax as a mildew killer. Proper drying between layers should be sufficient, as long as the finished piece is not hung in a humid area.
Composition Notes
The Rule of Three:
Examine any old masters' paintings, book jackets, or posters and you will discover those that feel balanced have an underlying structure. The first part of “The Rule of Three” suggests that a visual page of any kind is more interesting if it is organized around thirds, either horizontally or vertically (and sometimes both). A page divided around a two thirds/one third division is usually more energetic and vibrant than one rigidly divided in half, which might be formal or static.
The visual elements in the pieces will be arranged either along or around these imaginary horizons. This underlying structure may be created with color, shape, line, or scale. Georges Seurat's “Sunday Afternoon” is a supreme example, as is Da Vinci's “The Last Supper,” which combines both thirds and symmetry.
The other part of The Rule of Three states that you should try to create triangles with your embellishments, motifs or colors. Repetition creates movement and rhythm because the eye goes from one to the next, so your embellishments visually unify your project.
Diagonals:
The other important lines hidden in painting's structure are the diagonals. Often the angle of the diagonal will be repeated in roughly parallel motifs. Again Georges Seurat shows this in “Bathers at Asnieres.” Have a look at Picasso's “Guernica.”
Happy Crafting!
After a long career designing for theater and independent films, Robyn Coburn finds her joy as an unschooling mother who also writes and crafts. She has been a confirmed greenie since working for Greenpeace during her college years in Australia. Robyn is currently working on two crafty books, a fairy tale screenplay and a TV series about doll making and collecting. A past speaker and funshop presenter at Live and Learn Unschooling conferences, she contributes regularly to unschooling e-lists. She lives in Los Angeles, California with her husband James and ever inspiring daughter Jayn. Contact Robyn by email at dezignarob@gmail.com or visit her at www.robyncoburn.blogspot.com and www.Iggyjingles.etsy.com.
|