Crafting for a Greener World:
A Change Is As Good As a Holiday -
Revamping Old Furniture
by Robyn Coburn
 In the northern hemisphere it’s summer. The light lasts forever on a sunny day, plus hot, dry weather helps paint dry fast. In the northern hemisphere it’s summer. The light lasts forever on a sunny day, plus hot, dry weather helps paint dry fast.
I’ve spent a lot of time over the years refinishing wood furniture. For theater shows, I’ve distressed new furniture to look aged, I’ve embellished plain furniture to look expensive, and I’ve refinished old furniture to look contemporary. I’ve customized dining chairs as a special gift. I’ve revitalized junk to make it interesting.
There is one major college and one smaller design school close to my neighborhood, so students populate many apartment complexes. This means every summer, as folks graduate and move on, furniture and other bits and pieces appear in the alleys out back.
We’ve rescued, over time, a small dining table, several bookshelves in different sizes, a low three legged stool with fancy carved feet (pictured here), a solid end table, a woven cane-backed arm chair with padded seat, a set of small wooden chests of drawers, and a child’s wooden table and matching bench. We have passed up sofas, mattresses, bed headboards, TV consoles, computer desks, drafting tables, coffee tables, and occasional chairs of various sizes.
College students are notoriously oblivious to ideas like furniture polish (my home-made recipe follows) so their old chairs and all kinds of tables tend to have a nice degraded finish. It’s easy to refinish this sort of old wood furniture and get a cool result. Other than alleys and sidewalks, good sources of junky furniture might include thrift stores, your basement, and Aunty Mabel’s attic.
Age means that you probably don’t need to sand, unless there is peeling or loose paint, or areas of high shine. Instead, scrub the item with a barely damp cloth infused with a touch of dish liquid or all-purpose liquid soap (see recipe in my November/December 2010 column), and then again with a bit of vinegar to remove all greasy stuff and residue, and you are ready to work. Oh – and lay out a good-sized drop cloth, canvas, or old sheet to protect the ground or floor.
Dyeing Wood
Fabric dyes work well to subtly tint bare or light colored wood. The color is translucent, so the wood grain shows through, and the finish will be matte. Generally, I recommend following up with a gloss sealer, varnish, or wax- based polish to protect the wood. Look for acrylic sealer brands with low or no VOCs and the seal of approval from ACMI.
I like to dissolve the liquid or powder in only half the hot water recommended for a cloth dye bath, thus keeping it concentrated. I recommend rubber gloves to protect your hands. The dye can be brushed on with an ordinary chip brush or a sponge. Since it will run, it is best to turn the item so that you are painting across horizontal surfaces. You can add several coats for depth of color.
Alternatively, you can use regular food coloring to make a translucent dye for wood. It’s so simple! Add a one fluid ounce bottle of color (and they can be mixed like other inks) to a half cup of white vinegar. Paint directly onto the prepared wood. Follow up with polish or sealer.
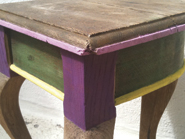
Gypsy Painted Furniture
This idea is influenced by vividly painted gypsy wagons. I once decorated a matching pair of chairs this way as a wedding gift. The best type furniture for this has turned or carved legs, and carved, routed, or shaped details. You will be painting the details, not the broad expanses of the back or sides (unless you want to!).
If you want to use painters’ masking tape to separate colors, you can, but if you have a steady hand this may be unnecessary. If you have acrylic paint left over from home painting jobs, you can use it, but ordinary non-toxic acrylic craft paint, especially in gloss finish, also works very well, since you only need small quantities of three or four of your favorite bright colors.
With a small brush, paint each small segment a different color, ideally leaving a wood space between the colors. Allow to dry, then paint a second coat. Also paint any routed edges or concave carvings. The idea is to enhance the contrast between the distressed or tinted wood finish and the shiny colors.
If you like the look of it, use a pencil with a round eraser tip to stamp some contrasting dots in some sections.
Distressed and Cottage Style
Giving mismatched pieces the same treatment creates wonderful unity. Pale or pastel finishes with worn edges are easy to achieve on older furniture. Clean off dust and grime as before. Start by smearing, sparingly with a sponge, small amounts of petroleum jelly on edges and anywhere else you wish to enhance the aged effect. It acts as a barrier to the paint. Use the existing wear as a guide. Don’t be afraid to let prior layers of color show through.
Paint with white or cream water- based paint or milk paint. This is one time when perfection is a detriment. Once the paint has dried, lightly sand along the edges and spots where you previously put the petroleum jelly. Even a rough cloth will work well. The whitewash should peel away, leaving a distressed finish. A nice detail can be created with some metallic finish acrylic paint (or artist’s acrylic) to add details.
These pieces look nice with a gentle aging sheen. I like using tan or brown shoe polish, smoothed right over the paint with a cloth and then polished off with another – old athletic socks work very well. Or use the old fashioned furniture polish below, tinted with icing gel color.
My Old Fashioned Furniture Polish Recipe
In the olden days when I lived in Wollongong, Australia, I made this to clean the old coffee table and some other hand-me-down furniture in the house. Melt a ten-inch paraffin or beeswax taper candle with the juice of one lemon (a scant quarter cup) in a double boiler. As soon as the wax has melted, pull out the wick and take it off the heat. Slowly drizzle in a quarter cup of any unsaturated oil while whisking vigorously. Olive oil is nice – the result can be a pretty pale green – but canola works well too.
You are making an emulsion, which will turn a light color, just like making mayonnaise. Stop as soon as the last bit of oil is incorporated. (If you keep stirring, the mixture breaks apart.) Pour into a small storage container and let it cool. Leave the lid off until the polish is completely cooled, or the lemon juice can condense out. To prevent mold formation, use within a month or refrigerate between uses.
To use, apply sparingly with a soft cloth brushed along the grain of the wood, then polish off with another cloth. It cleans and moisturizes wood surfaces. Perhaps the best thing about this polish is how nice your hands will feel after using it.
You can tint the polish with cake decorating gel colors, just like fondant. Use a tiny bit on a toothpick and stir into a small quantity (a couple of tablespoonfuls) of the wax. For this, get out your gloves again.
Caution: There is a difference between old and antique. I wouldn’t risk this home-made wax on antiques or special finishes like gold leaf, which might react to the acid. In fact, cleaning valuable antiques at all is a debatable issue – they are probably best left to restoration experts.
These techniques work perfectly well on smaller wood pieces – boxes, dolls’ furniture, picture frames, or for mixed media or collage art pieces.
Next time: making decorative art for the home from recycled materials using scrapbooking techniques. (These can be great family gifts.)
Learn More
Here’s a website with some refinishing tips: http://planetgreen.discovery.com/home-garden/5-tips-for-green-furniture-refinishing.html
More links on my Making, Mending, Mothering blog www.robyncoburn.blogspot.com
After a long career designing for theater and independent films, Robyn Coburn finds her joy as an unschooling mother who also writes and crafts. She has been a confirmed greenie since working for Greenpeace during her college years in Australia. Robyn is currently working on two crafty books, a fairy tale screenplay and a TV series about doll making and collecting. A past speaker and funshop presenter at Live and Learn Unschooling conferences, she contributes regularly to unschooling e-lists. She lives in Los Angeles, California with her husband James and ever inspiring daughter Jayn. Contact Robyn by email at dezignarob@gmail.com or visit her at www.robyncoburn.blogspot.com and www.Iggyjingles.etsy.com.
|