Crafting for a Greener World
Making Your Own Holiday Gift Wrapping
by Robyn Coburn
The year’s end is fast approaching, a time when many celebrate various religious holidays and others enjoy secular festivities to welcome the New Year. The big common denominator is the giving and receiving of gifts.
Around here, the holidays are marked by seasonal decorating, baking gingerbread, lots of crafting and seemingly endless wrapping paper. If you are like me, you take some care with the paper leftovers, flattening and rolling some for reuse or crafts and making sure that the rest are recycled.
This year, I want to start a new tradition by banishing new wrapping paper from my gifting. I have some crafty strategies for accomplishing this.
Make the wrapping part of the gift. Examples that spring to mind are inserting a book into a handmade book bag or cloth tote, tying a garment up in a hand- painted silk scarf and putting cookies or confections into a beautiful tin. Instead of purchasing a gift card, make a small envelope from felt or ultrasuede fastened with a connected elastic band, button or snap, and it can then be reused as a business card pouch.
Make the wrapping reusable for future gifting. Aside from cloth bags, all kinds of foodstuff boxes, as long as they are clean, can be opened at one end, painted, stamped or drawn on, decoupaged or glittered. Then staple on ribbon handles and add a festive removable ornament. Or flatten Chinese take-out rice containers, cover with recycled wrapping paper and fold them back together, staple or glue, then tie with a ribbon.
Fabric Covered Magazine Sleeve
A great gift that gives pleasure all year is a magazine subscription. Of course, digital magazines are great especially if they are timely. But if a magazine is very beautiful pictorially, or contains how-to info so we want to carry it into our workshop, we love having a hard copy. What about announcing your gift subscription with one of these beautifully covered sleeves made from repurposed cereal boxes?
Cereal boxes come in different sizes, as do magazines. First, ensure that your box has enough width for the magazine page.
I like the look of patchwork, but consider your recipient and their décor in choosing your fabrics. Old shirts, old pillowcases and the remnant bin are all useful sources. Avoid sheers. Iron your chosen fabrics. Measure about four inches from the bottom of the box on one narrow side. Draw a horizontal line across the width at this height. Rule a straight line from this point to the top corner of the box on the wide side. Repeat on the other wide side. This is your cut line. Cut the top off the box.
Lay the box down on the wrong side of your doubled fabric and trace the rhomboid shape lightly. Flip the box and repeat on the wrong side of another folded piece. Cut out, adding half-inch seam allowances all around.
Lay the back spine down on the wrong side of a doubled fabric and trace once. Lay the front end down similarly and trace once. Again, cut out, adding the seam allowances.
Cut only one piece of the bottom with the seam allowance.
Cut out a second piece for the bottom from felt without a seam allowance, and set aside for now.
Sew the lining spine, bottom and front together and press the seams flat. With right sides together, sew this long strip to the lining side pieces along the back, bottom and front, matching the seams with the corners. Snip the corners. Press seams. Turn inside out.
Sew the outside pieces to the spine and front pieces. Be careful not to take up more than the seam allowance, or the cover will not fit.
Matching corners and being careful not to pull on the bias (use plenty of pins), with right sides together sew the outside to the inside all around what will be the top edge of the magazine holder. Snip the corners. Press seams. Turn inside out, so that what you have is what looks like a sack with a kink in it.
Put a drop of glue on the four inner corners of the cereal box. Hot glue works well for this project, although a tacky glue or white glue will work as long as you give each step time to dry. Slide the bottom of the sack into the cereal box. A chopstick or knitting needle is handy for pushing fabric into the corners inside. The wrong side will be touching the cardboard.
Fold over and pull the outside over the box until it is fully smoothed over and the bottom of the fabric pokes the half-inch seam allowance beyond the box. Use glue or tape to fold over and attach the fabric to the box. Glue or hand sew the felt to the bottom of the box.
*Variations: insert piping into the seams. Make the whole thing from felt, hand sewn with contrasting thread, perhaps with the name of the magazine embroidered on the spine.
You may be wondering about painting the boxes instead. I doubt that painted thin cardboard surfaces will stand up to the wear and tear of magazines being pulled out. But why not decoupage the boxes? Use many layers, plenty of sealer, and still felt the bottom.
Gift Bags From Old Clothes
The legs and sleeves of outgrown or worn pants or tops are great for small cloth bags with drawstring closures. Sleeves are usually a good size for bottle bags. Jeans are especially cool looking.
Measure up from the hem the height you want your finished bag to be, adding about three inches. It is better to have a slightly bigger bag that will puddle a little, than end up with your gift straining the closure on the bag.
You now have a tube. Turn the tube inside out. Flatten with the seams together. Stitch straight across the bottom, allowing about a half-inch for the seam.
Create a box-shaped bottom by holding the end of the stitching and folding the vertical side flat along the seam. You will have a triangle with the point at the end of the stitching. Sew about two inches from the point, perpendicular to the bottom stitching. Repeat at the other end. Trim the excess fabric (a triangle shape).
Turn right side out. Now is the time to do any embellishing or embroidery such as blanket stitching around the top edge.
Examine the hem. If there is a large turn up, top stitch three-quarters-of- an-inch from the hem to create a pocket, otherwise use the existing hem as the pocket. Within this pocket, open a small slit in one of the leg seams – not the top stitched seam if jeans.
Using a safety pin, thread about a yard of ribbon or braid twice around the pocket. The ribbon should be narrow enough to slide freely, so that it will pull the bag closed and be tied in a pretty bow. Thread some beads on the ends and tie a knot to hold them.
*Variations: thread a length of elastic through the pocket, securing with a square knot, so that the bag is always automatically closed. Create an open topped gift bag by stitching two ribbon handles securely to the sides of the bag and cover the stitching with buttons or small flowers. 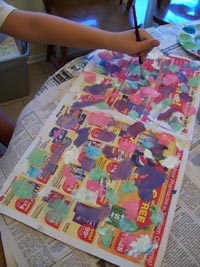
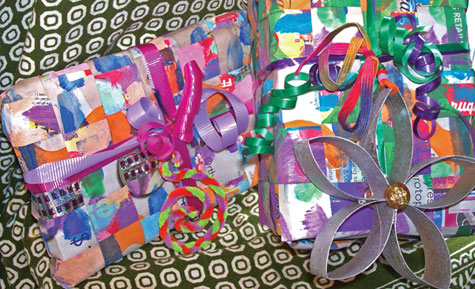
Woven Wrapping Paper
Lay out sheets of newspaper and advertising flyers on a work surface.
If desired, paint spirals, swirls, lines, dots and circles. Stamp with carved potatoes, cut apples, hand prints, or rubber stamps. Just make plenty of repetitive marks. Kids might enjoy smooshing color or finger painting. Allow the painted sheets to dry.
Using a pencil, mark a one-inch margin on the opposite sides of a sheet. Mark and cut parallel lines one inch apart between the margins. Folding the paper helps.
Cut one-inch wide strips from another sheet of paper. Shiny junk mail works well and doesn’t need to be painted.
Weave the loose strips alternately between the slits on the base sheet of paper. Use tape or glue stick to join strips as needed, and glue the ends to hold them.
These look grand tied with ribbon, picking up the background colors. To cut the sheet down for smaller packages, first lay a strip of tape down across the weaving, then cut down the middle of the tape.
*Variations: Vary the width of the slits. Insert a length of ribbon, sparkly yarn or plain colored paper randomly into the weaving. If wrapping a large gift, join more than one sheet with tape on the inside.
Happy Holidays, and Happy New Year.
After a long career designing for theater and independent films, Robyn Coburn finds her joy as an unschooling mother who also writes and crafts. She has been a confirmed greenie since working for Greenpeace during her college years in Australia. Robyn is currently working on two crafty books, a fairy tale screenplay and a TV series about doll making and collecting. A past speaker and funshop presenter at Live and Learn Unschooling conferences, she contributes regularly to unschooling e-lists. She lives in Los Angeles, California with her husband James and ever inspiring daughter Jayn. Visit her website to view her work.
|