The Spirit of Green Interior Design
by Eileen Wosnack
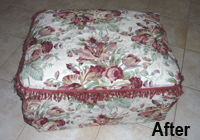
New Life for an Old Piece of Furniture
 Take one old footstool and one piece of vintage fabric, put them together and you have a charming example of re-using and recycling for your green home. Take one old footstool and one piece of vintage fabric, put them together and you have a charming example of re-using and recycling for your green home.
With a little creativity, iron-on seam tape (hemming tape) and trim, a great piece or two of serviceable vintage fabric can be transformed into a slipcover for an ottoman or footstool. No sewing is required and basic skills will demonstrate good results. Iron on hem/seam tape (narrow), rope, string, ribbon or other trim and fabric are the materials and the tools are scissors, measuring tape, pins, iron and ironing board and chalk (optional). Let’s get started!
1. First find a old footstool or ottoman. This will determine the size of the fabric needed to work with. A basic rule is you will need twice the size of the furniture in fabric. Measure the top, both length and width, and then measure the drop, which is the distance from the top to the floor. Draw this out on a piece of paper so it is clear. For the demonstration project, the footstool is twenty-four inches long by eighteen inches wide with a twelve-inch drop and one-inch casters. The drop, then, is really thirteen inches from the top to the floor.
2. Add the drop on one side, plus the width, plus the drop on the other side, to get the width of the fabric that you’ll need. In this case, it is two multiplied by thirteen plus eighteen equals forty-four inches. You could get away with a minimum of forty-five inches, but a little more for the hem is better, say forty-six to forty-seven inches.
3. Now for the length. Add the drop on one end plus the length, plus the drop on the other end...or twice the drop plus the length of the ottoman. For this project, it is two multiplied by thirteen plus twenty-four equals fifty inches. Again, to allow for a hem, you will want at least fifty-one or fifty-two inches.
4. The piece of fabric you need is forty-seven inches wide by fifty-two inches long. A yard- (thirty-six inches) and-a-half of forty-five-inch wide material will work just great with a little length adjustment so the slipcover does not grace the floor, but just clears the casters. If the vintage find is more generous in measurements, especially the width of the fabric, so much the better. If all else fails, just drape the fabric over the stool and see if it works!
 5. The trim length required is enough to wrap the circumference of the ottoman. For this project, the stool is eighteen by twenty-four, so two sides of eighteen and two sides of twenty-four, plus ten to twelve inches for tying will be used, or around eight feet. Ribbon, rope, string, fancy trim or something that can be tied and that matches the fabric would add to the custom look. 5. The trim length required is enough to wrap the circumference of the ottoman. For this project, the stool is eighteen by twenty-four, so two sides of eighteen and two sides of twenty-four, plus ten to twelve inches for tying will be used, or around eight feet. Ribbon, rope, string, fancy trim or something that can be tied and that matches the fabric would add to the custom look.
6. The amount of hem/seam tape needed will be the length times two and the width times two of the entire fabric piece, plus four to six inches for error correction. The project fabric is forty- seven by fifty-two, multiplied by two, plus four equals two hundred and two inches or 5.6 yards. (If hem tape is not going to work for you and no one you know sews, then the fabric can simply be cut to size and left as is with the understanding that it may ravel or fray in time. With some decors, this natural, unfinished edging can add to the overall effect of the interior design scheme.)
7. If you plan to wash the fabric in the future, do so before measuring, as most fabrics that have not been previously washed will shrink. This pre-washing will also check for color-fastness. Wash in cold water with natural laundry soap and a little borax or baking soda to brighten the fabric. If the material is white, an ounce of hydrogen peroxide may be added to the water, but bear in mind that it will also bleach out colors. Air dry the fabric by hanging it in the sunshine and wind, which will also freshen it and help remove and dust mites.
8. Turn the iron on to the setting suggested by the iron-on hem tape (usually hot), but bear in mind the type of fabric you are bonding as well. Vintage cotton, linen, silk and hemp can take high temperature, however the newer synthetics cannot or they will melt.
9. Use narrow seam binding tape or hem tape that is designed to iron on. In order to avoid the small amount of possible toxins when the adhesive tape is heated, those who sew or know someone who does can skip this step and machine or hand sew the hem instead.
10. First measure the hem. If there is adequate fabric, measure an inch to two inches of fabric all around the outside for the hem (you would have allowed for this in the first cutting stages). If you have forty-five-inch fabric, then a half-inch is all that will be available to turn up as a finished edge. Pin the hem in place, so it is even all around and press with the pins in place, then remove them and press carefully again, ensuring the hem remains consistent.
11. For the corners, the simplest procedure is to press the opposing sides first then press the corners over the already turned side. Advanced sewers will know how to cut a V-notch out. Once the hem is pressed and the pins removed, insert the seam tape under the hem so it cannot be seen. If the tape is not completely covered by fabric, it will melt onto your iron or ironing board cover. (It can be cut to fit).
12. Press according to manufacturer’s guidelines with extra care at the corners. At this point, if you are a sewer, a needle and thread whip stitch over the double corners will keep the hem in place.
13. Center the fabric over the ottoman. For type-A personalities, an exact center measurement marked by chalk might be necessary. For everyone else, just wing it because the project is repositionable.
14. Tie the trim around the middle of the fabric and fashion a nice knot or bow, securing it in place. Adjust the gathers evenly so the fabric appears balanced all around. Another option is to tuck the corners in squarely, similarly to making a hospital-style bed.
15. If you only have enough fabric to cover the top and first few inches of drop, it can still be used. Simply cover the top handkerchief style, then fold another piece of fabric over a string or cord for a skirt and overlap the top piece, securing the string on the inside and concealing the joins, forming the skirt. Voilà, an instant variation. This optional method can be used for seasonal changes or to add color for holidays, such as red or green at Christmas.
16. If all else fails, you can duct tape or use masking tape to secure the edge under the footstool! It might not be the most eco-friendly option, but it will work.
17. You might want to pad the top and/or sides with an old quilt remnant if the footstool is very firm. Just cut it a bit smaller than the fabric and, if it is fairly thick, you may need to cut out the folded sections at the corner and whip stitch them in place.
So, out of a bit of used fabric and with the aid of some simple tools and materials, a wonderful slipcover has magically transformed a dowdy, worn stool into an appealing decorating accessory...and you did it yourself on a shoestring. But shhhhh, no one has to know that part. Live green and prosper, ahem, on a budget!
Eileen Wosnack is the principal designer of Spirit Interior Design in White Rock, British Columbia and founder of Eclectrix™ Organic Home, a sustainable organic interiors store. She is a member of the Canada Green Building Council and the Organic Trade Association.
|