Put Your Veggies To Bed
The whys and hows of raised bed, intensive gardening
by Monika Carless
 Raised bed intensive gardening is a great description of a simple way to grow a lot of food in a small space: It's raised off the ground, and you plant intensively. Raised bed intensive gardening is a great description of a simple way to grow a lot of food in a small space: It's raised off the ground, and you plant intensively.
I started with sand and gravel. As the last of the glaciers retreated from Georgian Bay, they left what is now the predominant soil structure around the area of Midland, Ontario where I live. Theoretically, my garden zone is somewhere between four and five, but my particular acre of land, in a valley of sorts, surrounded on three sides by majestic white pine and facing in a southerly direction, often acts like a zone three. The garden is protected from wind and sudden frost and often receives twice as much rain as my not-too-distant neighbors. That’s most years; some years, I lose all sight of what is really going on here!
I have gardened here for the past eight years. What once was an open acre of land has filled in with a small barn and goat yard, a sixty- by fifty-foot vegetable and flower patch and an eight-tree apple orchard. The first year, I planted squash and garlic and started an asparagus patch. The next two years, I added potatoes, which loved the sandy soil. My planting style is: “Plant as intensely as possible, worry about how to get in to harvest later.”
The first soil amendments were composted chicken manure mixed with shavings, straw (as my mulch decomposed) and organic seaweed powder. Each year, there was less lawn and more local food! My foray into raised beds happened out of necessity. I wished to plant herbs closer to the kitchen door, but the area that I wished to plant could not be tilled or dug into, as it was too close to the septic bed. I had read about “lasagna gardening,” so after the beds were constructed out of hemlock boards and positioned on the lawn, we layered cardboard, leaf mulch, chicken manure and topsoil mixed with compost.
The beds are now spectacular with herbs and perennials. Each year, I add a bit of composted goat manure and mulch heavily with straw. These particular boxes are edged by grass, which is, in hindsight, lovely to look at in the late afternoon light but difficult to maintain. As I try to reduce my use of the lawnmower and trimmer, I find the grass an ecological strain. Learning from my trials and errors as the years have flown by, the plants themselves have been my most valuable guides to what works and what doesn’t.
Two years ago, I faced my growing dilemma of where to find the time needed for all this gardening. Somewhere around the end of July, I would become tired of every spare hour being spent in the garden, as it left so little time for book reading or visiting or just plain sitting down to rest; and the weeds would win the battle of “Whose garden is it anyway?”
I’d like to be okay with the weeds but, really, I love a very tidy garden. Even eating the weeds and making tinctures out of them on the full moon did not make much of a dent in my dilemma. Over the years, the soil has turned from sand to dark, nutrient rich, compost. It has benefitted from amendments and plant rotation. However, the constant rototilling also intensified the weed problem.
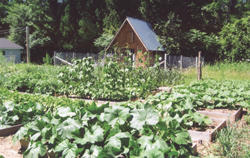
Research into Permaculture gardening had expanded my vision for no-till methods. Wishing to preserve the soil ecology that I had so painstakingly developed, and in deference to the many earthworms and soil bacteria that now teemed under the surface of the soil, I decided on converting the entire garden to raised beds! This time, we could not afford the hemlock. We bought pine boards and enlisted the help of our friend Bill to construct eighteen six-by- twelve-foot beds, organized over the face of the garden with just enough room for a small wheelbarrow to fit inside the rows.
In early May, I left for Colorado, where I helped my cousin plant a garden in almost desert conditions, near the border of Utah. Bill's wife Silke filled my boxes with topsoil, as only a true friend would. It was a very big job. That, and her helping me lay down garden fabric between the boxes, made me feel very guilty when she asked me why I could not just garden in rows like the rest of the world! We piled straw through the rows, adding kitchen compost and year-old goat manure/straw to the topsoil in the boxes.
We’ve decided on wood chips for the rows after this; the straw decomposed into a lovely weed growing medium over one season, curtailed only by a dense canopy of squash leaves. Last winter brought heavy tree damage but, in return, as we try to maintain a closed supply cycle on our property, we will be blessed with a plethora of wood chips from the fallen branches.
Borrowing from the philosophies of Bio-dynamic gardening, and Permaculture practices, we have been able to create a garden that supports the many eco-systems thriving on our smallholding.
Last year was my best garden yet! The raised bed system has provided me with many advantages:
Plant Earlier: Despite heavy rainfall, the beds drain beautifully and I can access the garden a good two weeks before my former first planting day in April.
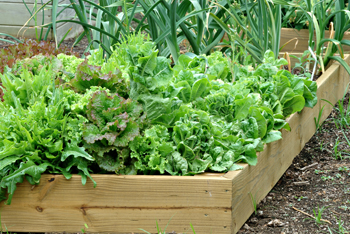
Creating a Raised Bed
A raised bed is simply a garden in an open-bottom box. It can be as simple or as fancy as you like, and it can be as high off the ground as you like. (Wheelchair gardeners, for instance, will want an elevated bed.)
If you’re building it in place, start by leveling off the ground where your bed will be located. Then mark out the perimeter of the bed using stakes and string as a guide.
Try to use wood that weathers well, such as cedar, because pressure-treated lumber contains poisonous preservatives. (If you’re using recycled boards, be sure they’re not pressure-treated either.) If you’re not a carpenter, you can have the wood cut to the required lengths at the lumberyard. For an elevated bed, you’ll need corner posts as well as side boards.
Once you’ve positioned the boards, pre-drill them to prevent the wood from splitting and nail them in place with galvanized nails.
Attractive raised beds can, with significantly more work, be constructed from layers of stones or bricks. In that case, you would create the garden by layering the soil, organic matter, etc. first, then building the retaining walls around it, leaning inward slightly and with the seams overlapping.
Either way, allow the soil to settle for a week or two, adding more soil as needed prior to planting. In very wet climates, you might want to dig a small trench around the perimeter of the raised bed and fill it with gravel to divert excess water from the pathways. |
Reduce Watering: Heavily mulching each bed keeps the soil dark and moist even during a drought period. For plants that do not like mulch, I am able to utilize beds that are more heavily shaded due to their proximity to the tree line. Tomatoes are fitted with individual watering devices made of a plastic spout attached to a decapitated water bottle. I can then water only the individual plant at the root level instead of the whole box. Tomatoes need extra fish fertilizer halfway through the season, applied to the leaves. You may decide that all things water-loving should be placed in beds close to the house and drought resistant crops in beds further out.
Customize Acidity/Alkalinity: Because I am surrounded by pines and cedars, I need to test the soil for acidity. My garden journal helps me to remember which beds where adjusted for what each year and, as crop rotation occurs, I am able to know definitively which bed is suitable for which vegetable. Everyone gets what they need, as each box is an entire garden in miniature. Good records are essential to maximize on soil fertility.
Weed Less!: Weeding has become a much lighter proposition. As time allows, I can weed one or several beds, in a very organized fashion and, if I have to leave instructions for someone else to weed a bed or two, they are easily marked. Because I plant intensively and use mulch, there are really very few weeds to speak of. The mulch between beds eliminates having to till or weed. Squash planted in eight of the beds create their own weed control and moisture retention. Be sure to plant semi-bush varieties or you will have squash in all the wrong places!
If a particular bed gets away from you and you feel pressured for time to weed it before the snow flies, just cover it with black plastic and in the spring you will find a warm bed that is easily weeded for stubborn roots. I have one bed full of dill, calendula and random lettuces that I leave alone for the most part, except for harvesting and thinning. Leave the volunteers; they are often the most hardy plants in the garden. A self-sown box like this is a blessing of Nature. If you like to eat weeds for their superior nutritive and healing powers, you can leave the odd dandelion, chicory or chickweed plant. They make great salad additives. Just remember to remove seed heads before they pop! I leave wild daisies and Johnny Jump Ups here and there, as well as self-planted sunflowers for food and beauty.
Increased Harvest: Boxes are great for planting closely. As long as there are enough nutrients in the soil, and you can keep up with eating all those baby greens and carrots and peas, etc, you will have a harvest of Biblical proportions. Last year, I harvested an average of thirty squash from each bed. That’s one hundred and eighty squash from a very small area!
Two beds of Siberian hard neck garlic turned over in late July were planted with cabbage plants started in the house, beets and late greens. Beds of heritage pole beans can be inter-planted with cool weather crops like lettuce, as the beans provide much needed shade for the greens. Shallots love the company as well. Plant the shallots in early spring on the outer edge of the bed. Add pole beans a little further in and seed lettuce in the middle. You can keep reseeding the lettuce all season under the growing bean vines. Neither the lettuce nor the beans nor the shallots need too much fertilizer, but they all like water, so they make good companions. I was taught that onions do not need much watering, but I have not found this to be true in my garden.
Raised beds can be used over and over as the seasons change, allowing for a three to four season harvest depending on your locale.
No-till Method: Preserve soil culture and decrease work load with the “no-till method.” One does not have to disturb the soil at all by adding compost to the beds each spring or fall and, as long as you are not stepping into the boxes, there will be very little compacting. A light fluff with a garden fork is okay for those who just love the sight of freshly worked soil.
Make sure that you build boxes that fit you! A four-foot by eight-foot box suits most folks just fine. If it’s uncomfortable to work, it’s too big. Try three-by-eight if you need to. If you bring in top soil to fill the new beds, it will need amending, no matter how much you pay for it. Rotted leaves, garden compost, cured manure, rotted hay or straw are all good additives. Some folks do not like rotted straw or hay because of a likelihood of weed or mold issues. I leave my straw out in the elements for half a year until it has sprouted all of its seeds or else it composts with the goat manure.
Mini Greenhouses: Create a mini greenhouse quite easily using row cover fabric for frost or pest control. Or build a cover out of wire and greenhouse plastic. The sturdier the frame and plastic, the better chance it will have to survive a heavy snow fall. A raised bed can also be converted into a cold frame. Organize your beds so that the greenhouse type ones are closer to the house for use in early spring and during winter months, depending on your climate.
Donate Some Boxes: Support the local community by sharing some boxes with mothers and tots, the handicapped in whatever capacity, the homeless or youth in mentorship programs. Working the land is a healing balm. Local artists may also find your garden an inspiring place to create. I call these Gratitude Boxes. The gratitude is mine; a garden is a blessing to share.
Free Time!: One of the best things about a beautiful garden is having the time to collect some herbs for the tea pot, then to sit and enjoy the view. This makes my garden a place that feeds my soul as well as my body. A raised bed garden has created balance in my life. Aside from that, the sight of a raised bed garden in full swing is quite intoxicating!
Experiment with your raised beds: You can create several different micro-climates in your garden, just by choosing varying positions. Some beds against a stone wall or flanked by a stone path can provide almost Mediterranean conditions but will require more water. A shadier area will be well loved by lettuces, onions and peas. You can organize boxes into a pattern of your desire, be it square or rectangular or hexagonal with a garden sculpture in the centre.
Strictly speaking, raised beds are best suited for areas of heavier rain as they drain well, and less suitable for arid regions or if you do not have the capacity to water your garden much. Water your beds early in the morning to avoid the spread of fungal diseases. Water deeply and only in areas that really need it.
Raised bed gardening may require some planning and note taking for best results, but it is still easier than all of that tilling and weeding!
Monika Carless, a former unschooling mom, works as a freelance writer and nutritionist. She is dedicated to promoting sustainable living practices. An animal and plant communicator, she is currently writing a book on the subject of plant consciousness, debating the issue of vegetarianism as it relates to spirituality and what the plants have to say about the food chain.
|